I’ll physically be away from my network for a while, so I figured it’s time for a more robust remote access solution. Previously I was using wg-easy, but this had it’s disadvantages. The native Wireguard app on Android was a total battery sponge, and configuration tended to be convaluted. I considered mesh tools like Nebula but I finally settled on the popular choice of Tailscale due to it’s generous pricing (free) and relatively simple configuration. I had a few goals in mind:
- Internal name resolution
- less battery consumption than Wireguard
- TLS on all connections to appease Bitwarden
Here’s what I came up with. This is a homologation of Tailscale docs, various tutorials, and good old fashioned trial and error.
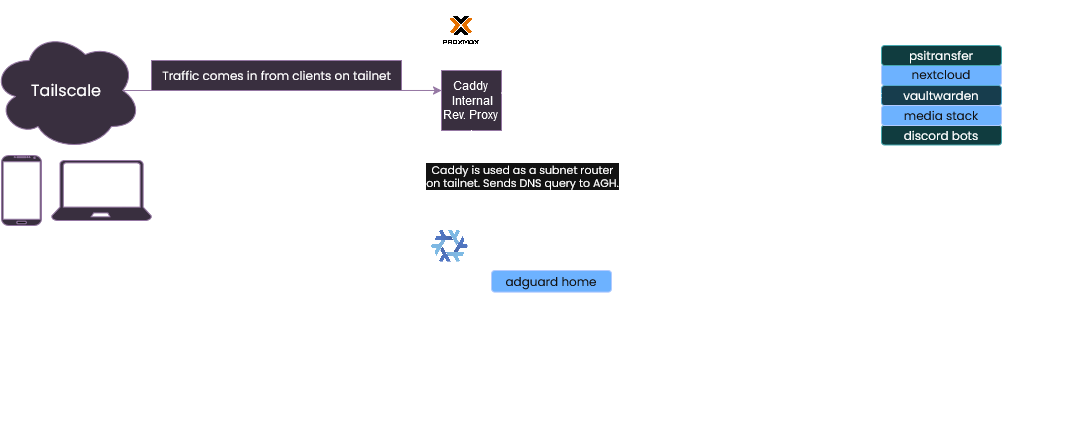
The caddy container is an LXC container within Proxmox, based off my container templates. Note that unprivileged LXC’s need a few adjustments to their lxc.conf
Setting up tailscale on Nix is as simple as
   services.tailscale.enable = true;
   boot.kernel.sysctl."net.ipv4.ip_forward" = 1; # needed for subnet routing
Check systemctl status tailscaled and following the instructions to authenticate.
Once authenticated, start tailscale and advertise your subnet with tailscale up --advertise-routes="192.168.1.0/24".
Login to the tailscale admin portal, find the node, go to the three dot menu on the right-hand side, “Edit route settings” and allow advertisement of your home subnet.
Caddy was my reverse proxy of choice here. This is also entirely possible with NGINX or any other flavor of reverse proxy, but Caddy’s automatic TLS is top notch. With the 01-DNS challenge, we can get certificates without even needing a single A records. To do this, you need to build Caddy with the Cloudflare plugin. Setting up Caddy with plugins on NixOS has it’s speedbumps. Caddy, being built in Go, doesn’t like any form of dynamically linked library, so any functionality needs to be built into the binary at compilation. Compiling a custom build with xcaddy isn’t something that I wanted to do from scratch; fortunately I found this functionality was recently added to the Caddy module in Nixpkgs.
 services.caddy = {
   enable = true;
   package = pkgs.caddy.withPlugins {
    plugins = [ "github.com/caddy-dns/cloudflare@v0.0.0-20240703190432-89f16b99c18e" ]; # get version stamp using go get, see below
    hash = "sha256-jCcSzenewQiW897GFHF9WAcVkGaS/oUu63crJu7AyyQ="; # use lib.fakeHash; and rebuild
   };
   configFile = pkgs.writeText "Caddyfile" ''
     # config here
     '';
 };
The versioning @ stamp doesn’t seem to have full shorthand functionality currently, but you can work around this with
go mod init temp
go get github.com/caddy-dns/cloudflare
grep 'cloudflare' go.mod # get stamp from here
cd ../
rm -r temp
Caddyfile syntax is very simple. At the top, add what Caddy calls a “snippet” with your Cloudflare API TOKEN.
     (cloudflare) {
        tls {
          dns <cloudflare-api-token-here>
        }
     }
I accentuated TOKEN because a Cloudflare API Key and an API Token are different things. Do not use the “Global API Key” or “Origin CA Key” already provided. In the Cloudflare admin panel, go to My Profile > API Tokens. Create a custom token, name it, and under “Permissions” click the “Account” dropdown and select “Zone”. Then in the next dropdown, select “Zone” and make it read-only. Add another permission, this time with Zone:DNS:Write permissions. Set this to include all zones and generate your key.
With that, configuring the rest of the Caddyfile is very simple. Point your internal domain to the IP and port of your service.
     bw.internal.domain.com {
       reverse_proxy http://192.168.1.140:4921
       import cloudflare
     }
The beauty of this solution is that you don’t even need a domain record for internal.domain.com, or even domain.com. Just have Cloudflare as it’s nameservers.
Now we have a reverse proxy and a private way to access it. We just need to connect the dots. The key here is DNS overriding, aka split DNS. My network uses AdGuardHome for name resolution, but PiHole should have similar capability. In AGH, go Filters > DNS Rewrites and make a new wildcard entry that points *.internal.domain.com to the IP of your Caddy box on your home subnet. In the Tailscale admin panel, go DNS > Add Nameserver > Custom and enter the IP of your AGH instance. Don’t use Tailscale’s SplitDNS. When you’re done, flip the “Override local DNS” switch.
Now I have a Tailnet with adblocking, internal domains over HTTPS, and peace of mind. I’ve only been running this setup for a couple days so far, but so far it’s been headache free. Tailscale seems to be a lot easier on my Pixel 6’s dying battery and applications like Bitwarden don’t complain about the server lacking TLS.